Most summers I complain about the excessive heat and humidity, but keep on sweating through it. Hearty meals give way to light summer fare–fresh vegetables eaten raw or steamed, quick-cooking stir-fry, cold sandwiches, and lots of fresh, locally produced fruit.
Lately, the heat has made me too queasy on many days for even my favorite summer foods. I frequently find myself falling back on the eating habits that carried me through the morning sickness of three pregnancies so many years ago–toast, crackers, and light healthy snacks throughout the day. Maybe it’s age. Maybe it’s the influence of the several young mothers-to-be in my circle of friends. Whatever the cause, I’ve been thinking more about cracker recipes and fine-tuning my technique.
If you’ve never had fresh, made-from-scratch crackers, you’re missing out on one of life’s simple joys. They’re quick and easy to prepare. I can make them in less time than it takes me to drive to town to buy a box of the store-bought variety, and the ingredients are cheap, easily pronounced, and always on hand in my kitchen.
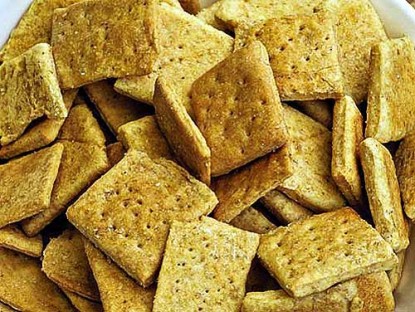
How to make Basic Whole Wheat Crackers:
1 cup unbleached flour
1 cup whole wheat flour
1 teaspoon salt
3/4 teaspoon baking soda
4 tablespoons cold butter
1 cup buttermilk
Preheat the oven at 375 degrees F, and have a greased cookie sheet or two ready.
In a medium-sized bowl, stir together dry ingredients well with a fork. Cut the butter into chunks and add to the flour mixture. Use a pastry blender to cut the butter into the flour.
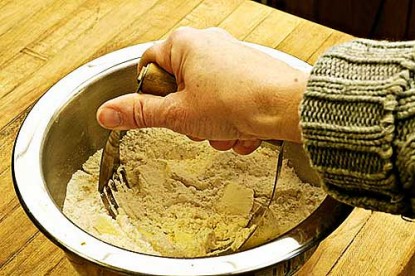
If you don’t have a pastry blender, you can use two table knives or even a fork. Keep going until the butter and flour mixture resembles rough crumbs. Stir the mixture a little, just to make sure there’s not a sneaky chunk of butter hiding down there somewhere.
Add the buttermilk.
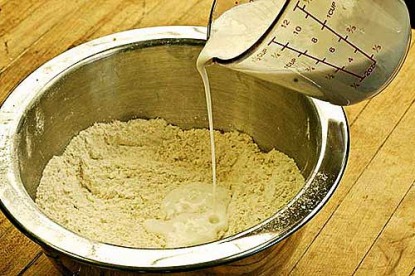
Mix gently with a fork until the liquid is absorbed and the dough sticks together. If you have obvious wet spots and extra flour, keep stirring. If you have a layer of extra flour at the bottom, you can sprinkle in a tiny bit of buttermilk over the dry stuff, then stir some more. Caution: if you must add extra liquid, do so in very small increments. Too much liquid creates a sticky dough, and that’ll give you all sorts of problems when you roll it out.
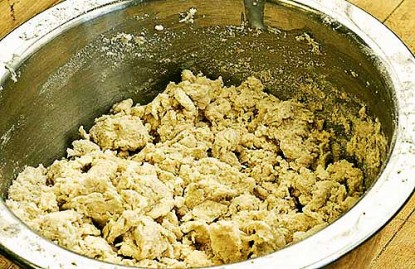
Now stick your hands down in that bowl and quickly shape the dough into a ball, then divide it in two.
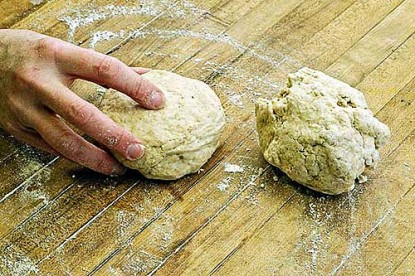
Lightly knead each of the smaller dough balls to smooth the texture. Do it quickly, and don’t overwork it. You don’t want the heat from your hands to melt the butter in the dough mixture. That’ll make the crackers tough instead of crispy.
Most cracker recipes suggest rolling out the dough between two sheets of plastic wrap or waxed paper. I hate using plastic wrap for two reasons. 1) It seems to me like a wasteful use of plastic. 2) The plastic wrap is a lot of trouble to work with, always sticking to what it shouldn’t and not sticking when it should. Maybe that’s just a personal conflict between me and the plastic. You go ahead and use it if you want. I’d rather use waxed paper, or nothing but a bit of sprinkled flour on the rolling surface.
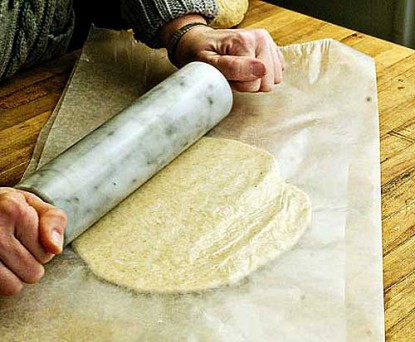
When I took the photos to accompany this recipe, I used waxed paper on the first dough ball. As I rolled and turned and rolled and turned, I remembered why I stopped using the waxed paper to roll out crackers.
A side note: the good part about using waxed paper is there’s no big flour mess to clean off the countertop. But the waxed paper tends to wrinkle up, and the dough sticks to the paper. As I recall, I had less of a problem with this particular issue the one time I used plastic wrap. But then there was that whole battle over the plastic wrapping up on itself.
With this particular batch, I had a little too much moisture in the dough, so it did stick some to the waxed paper. That’s usually easy to deal with. Just pull the paper back slowly, a little from this angle, a little from that. Take your time. If you don’t get in too much of a hurry, the paper will come off cleanly. You only need to remove the top sheet.
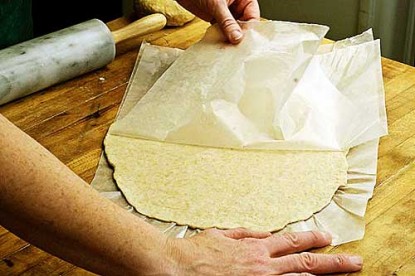
Use a pizza cutter or a knife to cut the dough into strips about 1 1/4 to 1 1/2 inches wide. Cut across the strips to make squares.
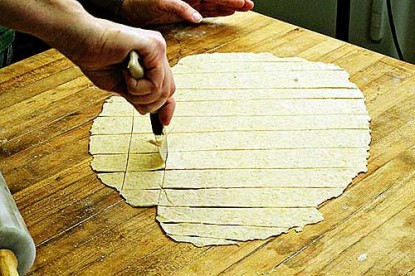
Peel up the squares and place on a greased cookie sheet. You can roll up the odd cuts and edge bits into a little dough ball, then roll it out to cut into squares, if you really want to. Or you could just stick the bits on the cookie sheet and bake them as they are. I’m lazy. I bake them as they are, call them test pieces, and eat them first.
Side note #2: The dough squares in the photo are a little too thick. I tend to have that problem when I roll out the dough between waxed paper sheets. Thinner crackers crisp up nicely. The thick ones, not so much. The thick ones are still edible, and they keep my queasy stomach settled when I don’t feel so well. They just aren’t as tasty, and they don’t have that delightful crisp texture that makes a cracker a cracker and not . . . say . . . a dog biscuit.
For the second ball of dough, I sprinkled flour on the counter and rolled the dough directly on the counter. To keep the dough from sticking, I turned the dough over frequently and sprinkled a thin layer of flour on the counter at each turn. I always get much thinner crackers using this method and have a lot less trouble with sticking. There is, however, more of a mess to clean up.
Optional step: Sprinkle a little salt over the top of the cracker dough squares once they’re on the cookie sheet.
Use a fork to poke holes in the dough squares. Bake at 375 degrees F for 10 to 12 minutes.
The finished crackers should be dry and slightly browned. They’ll harden as they cool. You can cool them on racks, on sheets of brown paper, or just leave them on the cookie sheet if you have a safe place to put them where they’re not likely to be bumped. Trust me, all it takes is one little bump of the pan for ten of those crackers to go flying off.
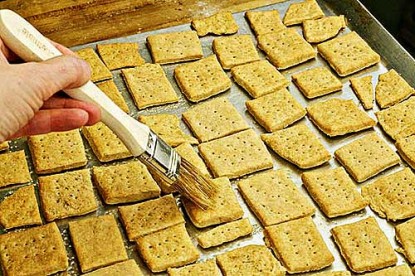
One last optional step–lightly brush some hot, melted butter over the crackers when they come out of the oven.
When cool, toss the crackers into a bowl. Leave them nearby for handy snacking. They’ll be gone by the end of the day. Or sooner. Much sooner. Especially if you put a bowl of dip close by.
Find this recipe on Farm Bell Recipes for the handy print page and save it to your recipe box:
Basic Whole Wheat Crackers
You can also find LauraP at The Land of Moo.
Interested in contributing a guest post to the Farm Bell blog? Read information here for Farm Bell blog submissions.
Want to subscribe to the Farm Bell blog? Go here.


Dede ~ wvhomecanner says:
Thanks! Crackers are hands-down my favorite snack! I’ll take good crackers over a chip any day LOL. Now if I could figure out how to make them good AND fat free ………
Will come back to these when WV weather is not so stifling hot and humid!
On August 15, 2010 at 8:20 am
Sandra says:
Thanks, Laura! These sound very tasty and easy! I’ve often wondered about making crackers and how difficult it would be….maybe not so difficult after all! I’ll definitely be trying these…although per Dede’s comment, maybe I should wait for a less humid day! BTW, my sweet husband bought me a marble dough board for my bread making endeavors….it is wonderful for rolling out dough!
On August 15, 2010 at 8:25 am
CindyP says:
I’ve always thought about making crackers, just never have! It certainly doesn’t look any harder than making a pie crust! Thank you!
On August 15, 2010 at 9:36 am
KentuckyFarmGirl says:
Oops, accidentally posted over on the actual recipe but wanted to say again that I am definitely going to try this! Thanks so much for the recipe.
On August 15, 2010 at 11:12 am
Pete says:
Sounds great! Imagine the possibilities of adding things, like maybe sesame seeds or some such. Yum! Definitely going to be trying these when it cools down enough to use the oven again.
Thanks!!
On August 15, 2010 at 4:53 pm
GrannyTrace says:
Looks yummy Laura!!
Thanks for sharing!!
Granny Trace
On August 15, 2010 at 8:30 pm
Ross says:
Good detail and find. Close to a biscuit recipe.
On February 2, 2011 at 3:19 pm
Kenya Cook says:
TIP: I have a recipe that calls for rolling out the dough directly onto an upside down cookie sheet. Then you can just cut them there and bake. I like not having to transfer all those little pieces from my board to the sheet and since you do in on the “wrong” side, you don’t have to worry about scratching your pan with the cutter. I have also tried rolling them out between pieces of parchment paper, using the paper to transfer them to the sheet and then just removing the top sheet and cutting them.
On May 9, 2011 at 4:39 pm
VTGypsy says:
I started using two of the reusable plastic cutting sheets to roll out my cheese cracker dough.
They are clear so you can see what you’re doing. They are flexible so that pulling the top one off isn’t a problem and they don’t wrinkle like plastic wrap or wax paper might.
You can cut the crackers out without caring what you do to the sheets because that’s exactly what they’re made for :o)
I think I’ll try this recipe for my next batch of crackers!
On August 20, 2011 at 3:19 pm