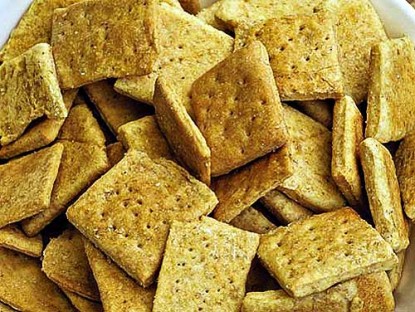
If you’ve never had fresh, made-from-scratch crackers, you’re missing out on one of life’s simple joys. They’re quick and easy to prepare. I can make them in less time than it takes me to drive to town to buy a box of the store-bought variety, and the ingredients are cheap, easily pronounced, and always on hand in my kitchen.
Difficulty: Easy
Servings: varies
Prep Time: 30 minutes Cook Time: 10-12 minutesIngredients
Directions
Preheat the oven at 375F, and have a greased cookie sheet or two ready.
In a medium-sized bowl, stir together dry ingredients well with a fork.
Cut the butter into chunks and add to the flour mixture. Use a pastry blender to cut the butter into the flour. If you don’t have a pastry blender, you can use two table knives or even a fork. Keep going until the butter and flour mixture resembles rough crumbs. Stir the mixture a little, just to make sure there’s not a sneaky chunk of butter hiding down there somewhere.
Add the buttermilk. Mix gently with a fork until the liquid is absorbed and the dough sticks together. If you have obvious wet spots and extra flour, keep stirring. If you have a layer of extra flour at the bottom, you can sprinkle in a tiny bit of buttermilk over the dry stuff, then stir some more. Caution: if you must add extra liquid, do so in very small increments. Too much liquid creates a sticky dough, and that will give you all sorts of problems when you roll it out.
Now stick your hands down in that bowl and quickly shape the dough into a ball, then divide it in two. Lightly knead each of the smaller dough balls to smooth the texture. Do it quickly, and don’t overwork it. You don’t want the heat from your hands to melt the butter in the dough mixture. That will make the crackers tough instead of crispy.
Most cracker recipes suggest rolling out the dough between two sheets of plastic wrap or waxed paper. I hate using plastic wrap for two reasons. 1) It seems to me like a wasteful use of plastic. 2) The plastic wrap is a lot of trouble to work with, always sticking to what it shouldn’t and not sticking when it should. Maybe that’s just a personal conflict between me and the plastic. You go ahead and use it if you want. I’d rather use waxed paper, or nothing but a bit of sprinkled flour on the rolling surface.
Tip: If there is a little too much moisture in the dough, just pull the paper back slowly, a little from this angle, a little from that. Take your time. If you don’t get in too much of a hurry, the paper will come off cleanly. You only need to remove the top sheet.
Use a pizza cutter or a knife to cut the dough into strips about 1 1/4 to 1 1/2 inches wide. Cut across the strips to make squares.
Peel up the squares and place on a greased cookie sheet. You can roll up the odd cuts and edge bits into a little dough ball, then roll it out to cut into squares, if you really want to. Or you could just stick the bits on the cookie sheet and bake them as they are. I’m lazy. I bake them as they are, call them test pieces, and eat them first.
Optional step: Sprinkle a little salt over the top of the cracker dough squares once they’re on the cookie sheet.
Use a fork to poke holes in the dough squares. Then bake at 375F for 10 to 12 minutes.
The finished crackers should be dry and slightly browned. They’ll harden as they cool. You can cool them on racks, on sheets of brown paper, or just leave them on the cookie sheet if you have a safe place to put them where they’re not likely to be bumped. Trust me, all it takes is one little bump of the pan for ten of those crackers to go flying off.
One last optional step: lightly brush some hot, melted butter over the crackers when they come out of the oven.
When cool, toss the crackers into a bowl. Leave them nearby for handy snacking. They’ll be gone by the end of the day. Or sooner. Much sooner. Especially if you put a bowl of dip close by.
Categories: Appetizers & Snacks, Breads, Other Breads
Submitted by: laurap on August 15, 2010


KentuckyFarmGirl says:
Definitely going to try this! Thanks so much for posting the recipe1
On August 15, 2010 at 10:59 am