The word ‘bokeh’ is very popular right now, so in this installment of my ongoing series in helping me–and you–take better photographs of food, I want to explain what that really means. Bokeh is a Japanese word for blur, but when it’s applied to photography, it doesn’t just mean any blur. It relates to the quality of blur, and good bokeh requires good light. That’s why most often you’ll see great examples of bokeh in nature photography.
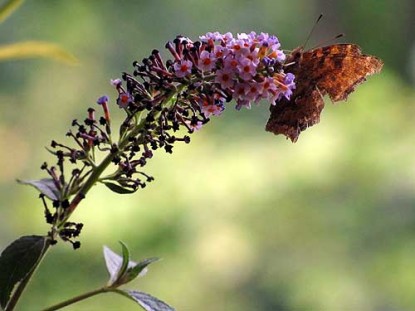
Notice all the light back there. The shallow depth of field places the focus on the blossom and the butterfly, blurring a pattern of light in the background. (Circular patterns of light make the best bokeh.) This not only tells us what to look at, but makes what we’re looking at look better–which is why it’s a great way to photograph food!
To achieve bokeh you need to set a low aperture (f-stop) number and focus closely, from a short distance, on the food. You also need some form of light–natural, candlelight, or even indoor lighting, to provide the bokeh’s light source.
A shallow depth of field alone, creating a blurry background, is not the same thing as bokeh.
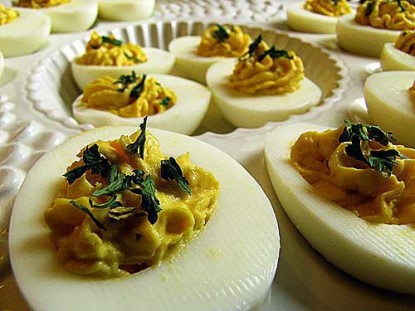
In this photo, above, the blurred background is NOT bokeh. There is no pattern of light. This is simply a shallow depth of field. Bokeh involves light, not just blur.
If you don’t know how to control the manual settings on your camera, you can achieve bokeh anyway! I’m going to demonstrate that by showing you a couple of photos in which I achieved “accidental bokeh” to prove it to you.
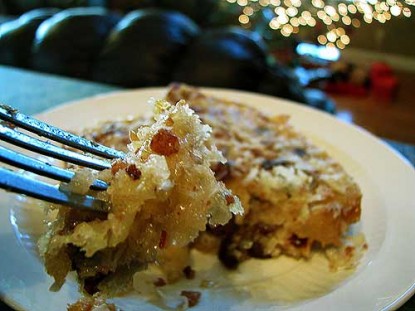
The bokeh here is achieved by focusing closely on the coconut toast with Christmas lights in the background.
The bokeh in this photo, below, is created by a close focus on the cheesecake cookies with natural light from a window beyond.
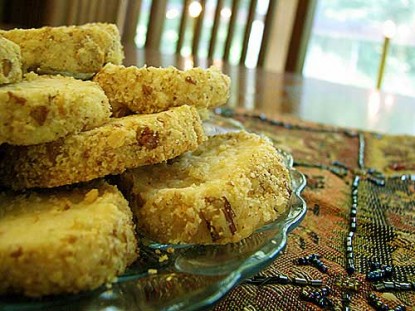
Notice how the narrow focus draws your eye to the food while the soft bokeh light in the background makes the food appear even tastier.
Remember that I had no idea what I was doing. These photos were taken using nothing more high-tech than the macro button. I’ve always found photos like this to be somewhat of a wonder, sort of magical. Now I know how and why they happen, so I can work on creating food bokeh on purpose! You can do it, too, even if you have no desire to use the manual settings on your camera. You can just set up the environment in which your camera can automatically achieve bokeh for you. Here’s how:
1. Get close to your food–using your zoom and macro button on Auto, or getting right up close with your super macro if you have that option. (On most cameras, you’ll find the macro and super macro as a “flower” button.)
2. Put some light in the picture! Use a window. Or set your food outside to capture natural light. Use candelight or Christmas lights. However you do it, get some light in the background to feed the bokeh! Bokeh can’t exist without light.
This will NOT result in bokeh in every instance, depending on other factors that will also guide your camera’s automatic setting selections in individual shots, but you can always set up the elements that can create bokeh (tight focus and background light) and try. It can happen!
If you’re not opposed to using your manual settings and you want to create bokeh deliberately (instead of chancing it on automatic), set a low aperture (f-stop) number for a shallow depth of field, adjusting other settings to compensate as needed, then follow steps 1 and 2 above.
Okay, go make some food bokeh this weekend! (If you post a food bokeh shot on one of the recipe galleries here, let me know so we can all go see!)
Interested in contributing a guest post to the Farm Bell blog? Read information here for Farm Bell blog submissions. Want to subscribe to the Farm Bell blog? Go here.


CindyP says:
John always has the questioned look on his face as I’m traipsing a plate of food around trying to get that effect…it’s doable with a point and shoot, but mine doesn’t have enough control to make sure I get it, it’s one of those !GREAT! things when it happens!
On June 25, 2010 at 8:47 am
glenda says:
I was hoping you would keep giving us tips on photography! Thanks.
Cindy, my husband is so used to my taking food pics that he even says ‘you should take a picture of this’ when something turns out well! I usually do.
On June 25, 2010 at 4:38 pm
monica says:
Wow I can even see the ‘skin’ on the nuts in the cheesecake cookies! Another skill that I have yet to master–Oh wait. . .half the time I can’t even FIND the camera. You go, Girl! You could be one of those food photographers that make a ton of money!
On June 25, 2010 at 7:44 pm
Pete says:
Have a couple posted that you are welcome to critique. The first one https://farmbellrecipes.com/chile-pepper-jelly/ looks like I used the flash, but since I almost never do, I have no good explanation for the reflected light from the jars.
This second one https://farmbellrecipes.com/chili-gravy-canned-version/ is from the same location, my skinny back deck. Slightly different angles, slightly different light conditions. You get to guess what is in the background!
And yes, I already know some of the more serious flaws in the pics, so you will not hurt my feelings by mentioning them! This is an object lesson, right?? 😉
On June 25, 2010 at 9:22 pm
Suzanne McMinn says:
Yes, we’re all about object lessons!!
Your canned chili gravy has a very nice soft bokeh!!!
The chile pepper jelly is actually a very pretty photo, but the light is in the foreground, so it doesn’t qualify as bokeh. (It does look like light from a flash.) But the photo is very appealing anyway!
But go back and look at your accidental bokeh in the canned chili gravy post. See how soft that is, how it makes the picture without detracting from the main focus, the jars? Very nice!
On June 25, 2010 at 9:56 pm
Pete says:
Now an explanation – have been experimenting for a couple of months now with the lighting conditions on that deck. It has that background which is always good, but ocassionally wonderful, with early morning filtered sun. It gets brighter during the day, and very strange, but interesting, in the evening. The early day hours are best for food shots – not particularly great for making something later in the day, if the desired effect is the bokeh!
For comparison, there is this one https://farmbellrecipes.com/helens-pimento-cheese-spread/ taken at the same spot in the late afternoon. OK as a food shot – at least it gets the job done, but nothing to brag about as a pic.
On June 26, 2010 at 7:59 am
monica says:
Okay Pete . . .I get it now: I thought that it was more like the drape that goes behind the portraits when at a Sears studio. I will have to experiment with this now. Now where is the camera???
I noticed that even though it is the same area, the colors of the flowers are completely different–Maybe the angle of the sun had something to do with it. September sun is different than April because of the slant.
They all look good enough to eat.
On June 26, 2010 at 3:50 pm
Pete says:
The flowers are not the same, or even close to the same color. The colors are true in all the shots, though. That last one would have been a whole lot more interesting had there been some light in the background, which is rather the point of Suzanne’s post, I think! Nondescript but reasonably well lighted busy-ness in the background helps to focus your eye on the intended subject by offering something pleasant to look at but impossible to focus upon.
On June 26, 2010 at 11:26 pm
brookdale says:
Now I know what bokeh means…thanks!
On February 10, 2011 at 2:00 pm