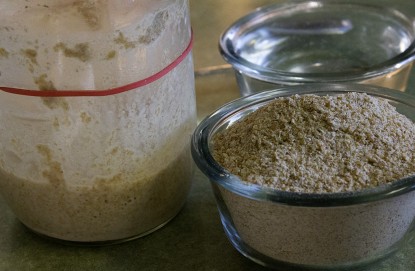
Natural yeast seems like a mysterious sort of pet that you have to baby a lot. People get stressed out about the whole ‘feeding’ thing.
Well, I’m here to tell you that it’s just a matter of remembering a couple of techniques and you’re on your way to maintaining a fabulous, healthy yeast start.
Once you have a healthy yeast start, then it’s easier to find ways to use it. Here’s how it works.
First decide: Do you want a sour start or a sweet start?
1. Feed twice a week or more if you want a sweet start.
2. Feed once a week if you want a sour start.
I have two jars: One is a sweet start (wide mouth jar), one is a sour start (narrow mouth jar). I also wrote SWEET and SOUR on the lids so I don’t forget which one to keep sweet.
Care and feeding of your start:
1. Keep your start in a quart jar.
2. On feeding day, pour the yeast into a bowl. You’ll have about 2 1/2 cups of start. Don’t wash the jar! It’s full of good yeasty bacteria.
3. Into the now empty yeast jar, put:
1 cup of the old yeast start
1 cup of whole wheat flour
1 cup of warm water
Notes: My start likes whole wheat flour much more than white flour. Much more! If you feed with white flour, it will take about 1 1/2 cups (or more) of flour to get it to the right consistency and it will bubble differently than what you see in these pics.
What is the right consistency?
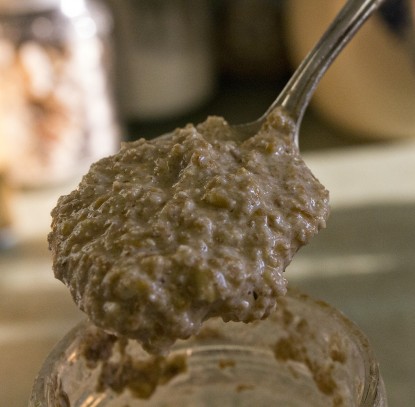
You want to add enough flour to make it the consistency of oatmeal – not too thick to stir easily, and not too soupy.
How long does it take to rise?
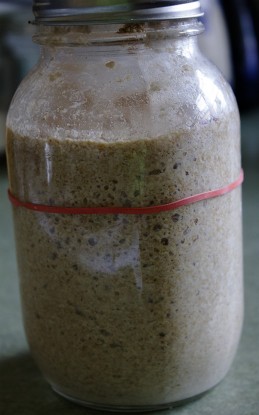
Once the old start, the flour and water are stirred well in the jar, I put a rubber band around the level it starts at so I can see how much it’s rising.
Then I put it in a warm spot and wait.
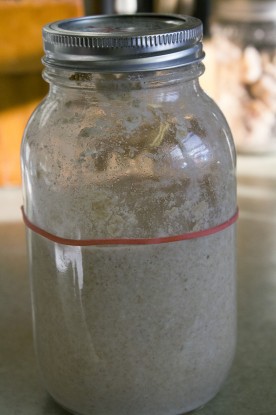
And wait.
After a couple of hours it looks like this (below). All those bubbles are evidence that the bacteria is working on the flour and expelling carbon dioxide.
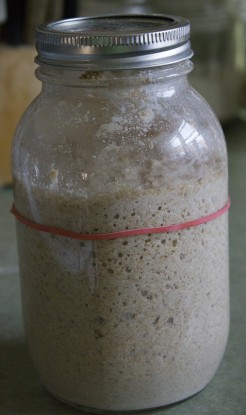
Carbon dioxide is what makes your bread rise.
And after another hour or so, it looks like this (below). Now you can pop it in your fridge and ignore it for a couple of days.
Where do you keep the yeast when you’re not feeding it?
I let it rise for a few hours on the counter, then I put it in the fridge. You can also just pop it in the fridge as soon as you feed it. It won’t rise as spectacularly, but it’ll do its thing just fine.
But what do you do with the leftover yeast?
Make something with it, like pancakes or cardamom buns or bread or whatever you want. If you don’t have time to bake, then toss the start or give it away.
Do not feel guilty for throwing it out or washing it down the sink. Flour is super cheap (much cheaper than cat or dog food) and if you feel guilty, then you won’t enjoy your start and if you don’t enjoy it, then you won’t use it. Most of us don’t have the time or desire to bake bread twice a week. Or even once a week. It’s okay to toss the extra start until you have that one weekend a month to bake bread.
Really. It’s okay.
Your primary goal is to feed your start, not to make stuff with it. This is opposite what you might think. Once you get in the habit of feeding it, then you’ll start thinking of ways to use it. If you’re always focused on making stuff, but forget or get stressed about feeding it, then you won’t have yeast to make stuff with. Stay focused on feeding.
Other tips:
1. Keep your start on the top shelf of your fridge where it’s easy to see. If it starts going grey or dark, you need to feed it. Sometimes liquid pools on top – if so, pour it off. Scrape off any dark yeast and pitch it, then feed the start and use the extra if you need to. Pitch the extra if you don’t need to use it.
2. Which brings up vacations. If you’re gone for a couple of weeks, it’ll be fine. You don’t need to hire a yeast sitter. Scrape off the dark and feed it when you get home. If it’s gone sour, then feed it every two days until it’s sweet again. It usually sweetens up after two or three quick feedings.
3. If a recipe calls for only 1/2 cup of start it is okay to use more! We use the whole 1 1/2 cups of extra yeast start when we make dough. It might take a bit more flour to get the dough to the right firmness, or you can subtract a bit of your other liquid to get the right firmness (leave out 1/2 cup of water, for example).
Find recipes for starters on Farm Bell Recipes here.
Robin from Rurification blogs at Rurification.
Do you have a recipe post or kitchen-related story to share on the Farm Bell blog?
See Farm Bell Blog Submissions for information and to submit a post.
Want to subscribe to the Farm Bell blog? Go here.


Robin from Rurification says:
A couple more notes: I got my original yeast start from CalebWarnock.com. Email him and he’ll send you a start.
Also, I discovered that my start likes HOT water, so I use hot water now when I feed it. I get a rise all the way to the top of the jar. Here’s a pic of that: http://rurification.blogspot.com/2012/11/feeding-your-natural-yeast-start.html
I must say that we love the way this yeast tastes and smells. Delicious.
On January 19, 2013 at 7:25 am
lisabetholson says:
Robin I have always felt guilty just to think I wouldn’t have time to use the starters and I never knew there was a sweet and sour starter. This is great, THANK YOU
On January 19, 2013 at 9:45 pm
Cathy J says:
This was very helpful! Thank you!
On January 20, 2013 at 12:31 am
Ulrike says:
What an interesting perspective. I confess I felt bad about dumping starter when I was feeding mine. Maybe I should try it again with a no-guilt rule.
On January 24, 2013 at 11:56 pm