Full picture tutorial here.
Difficulty: Intermediate
Ingredients
Directions
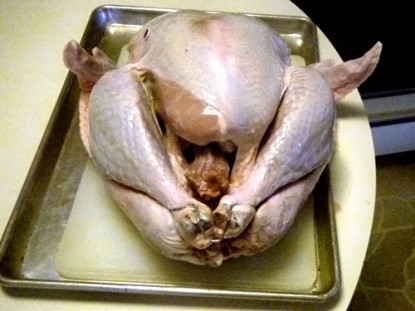
These steps apply to both chicken and turkey.
Step 1: Start by removing the neck from the body cavity and the giblet package from under the skin flap in the front. Force the legs free of the clip that shows as wire here and sometimes is strong plastic. Remove the wire clip by squeezing the sides together. The plastic ones I cut with pruning shears.
Step 2: This step requires a very sharp knife to do a neat and easy job.
Grasp the wing on the first joint, pull it away from the body, make a cut in the armpit and dislocate the shoulder joint. Finish the cut to sever the wing. Repeat this for the other wing.
Step 3: Removing the leg requires the turkey be on its back with its legs spread wide. Make a cut through the skin on the inner thigh so the leg can be pushed farther from the body. Starting near the tail, locate the hip bone and cut close to the hip until you reach the thigh bone. Dislocate the hip joint. This is a two hand job so lay the knife down. When the joint “pops” as in the picture, follow the bone along the back with your knife to sever the thigh from the body. Repeat this effort with the other leg.
Step 4: Separate the thigh from the drumstick.
Look closely at the fat lines on the leg. The yellow fat follows the thigh bone down to the joint. This is always true. It defines the location of the joint and the cut. If you hit bone with your knife, you have missed the joint. You should have about as much meat as fat showing on the thigh side of the knife when you make the cut.
Step 5: The breast portions come off next. You can feel with your fingers to location of the breast bone.
Locate this bone and cut straight down alongside the bone pulling the meat away from the cut as you go. This bone is wide and deep, curving to the sides. Continue to follow it, locate the ribs as you progress and cut as closely to the bones as you can. You will run out of meat close to the back and the boneless breast portion will come away in your hand.
Repeat this effort with the other side.
Step 6: All that you have left now it the carcass.
In this picture I cut the thin meat between the back portion and the ribs and broke the back by flexing it strongly and then cutting the meat that attaches it to the rib cage.
These pieces I seasoned and roasted for nibbling, then boiled them for stock.
I wrapped the pieces in coated freezer paper, labeled and dated them.
Categories: Tips & Tricks
Submitted by: ross on February 15, 2011


Add Your Thoughts
You must be logged in to post a comment.